Sunday, 10 February 2013

chinese new year in london

There are certainly perks to being friends with people who 'know people'. The friend in question in this circumstance is my very good friend Mel, and the 'knowing' is her adorable and very generous father Stanley Tse who just happens to be the President of the London Chinatown Chinese Association.

In case anyone missed it, this weekend hosted Chinese New Year festivities across the globe, with the biggest celebration outside of Asia taking place in and around Trafalgar Square and Chinatown in London. A fond farewell was said to the year of the Dragon, and a welcome '
Nǐ Hǎo' to the year of the auspicious Snake. Lea and I were fortunate enough to be invited along to share in the celebrations as VIP guests.


Each year these celebrations host a spectacle of Chinese culture where hunderds of performers take their place on the Trafalgar Square main stage, including the world-renowned Chen Brothers Flying Lion Dance and a variety of performers from Guangdong and Sichuan provinces.

We three had front row seats at the opening ceremony with the traditional 'dotting of the eye' ritual. 
According to Hakka tradition, the public cannot see the dragons until their eyes have been dotted - they did not come alive until the irises of their eyes were painted by several of the esteemed guests on stage.

The puppetry of the dragons was pretty fantastic and not something I'd witnessed before, complete with blinking eyelids, animated eyebrows and wagging tails. The acrobatics displayed on the tall, thin and very wet poles in front of the committed crowds was a great spectacle. The sky may well have been haemorrhaging for the whole day but the turn out was more than commendable.

Chen Brothers Flying Lion Dance
Upon receiving my invite a week or so ago, the print that immediately jumped out were those two often sought after words when reading any event description - 'buffet lunch'. And after listening to the speeches and watching the opening ceremony exposed to the bitter and wet February elements, the sustenance provided along with some hot tea hit the spot.

We laugh in the face of cutlery - go chopsticks or go home

Unending mountains of char siu pork - so very delicious

bean curd spring rolls filled with crunchy fresh bean sprouts and water chestnuts
  
Steamed buns filled with whole Chinese sausage

Pleased with our loot - this was only round one

These next items were my absolute favourite of the day, unable to get enough of them - even though I was fit to bursting I was successfully squeezing in more. They consisted of a char siu pork filling that you would usually find at the centre of a steamed bun, but were in fact encased in some sort of golden, light filo pastry parcel perfection and topped with sesame seeds. Oh my.


A half eaten close up - why not
Mel and Lea with the Chinese Money God
handing out red envelopes to the younger generation

If you've ever watched a HSBC advert around this time of year, you'll be well aware of the Chinese tradition where the older generations hand out red envelopes containing money to symbolise luck, protection and good health.

We said goodbye to our childhood many moons ago, but Stanley couldn't help but sneak us each a beautifully embellished red envelope as we bid our farewells. How chuffed was I - I've never received one before.


It was a great way to celebrate the new year celebrations, sharing it with the vast Chinese community present in the capital and the excellent show that Stanley, the LCCA and company put on. Bravo.

Kung hei fat choi and afiyet olsun.

Sunday, 3 February 2013

Chorizo with spinach and garlic

Some of the best meals are the ones that have the most minimal of ingredients - simplicity is a virtue best found in food (as opposed to people). It allows each ingredient to individually grab its five minutes of fame on the centre stage of your plate, whilst still providing an all singing all dancing ensemble for you to savour.


I had the weekend to myself and so indulged in quite a lot of food related activities - my default pastime when nothing else is occupying my hands or mind. Making cakes, catching up on this months Delicious magazine, planning meals for the week, booking tables at restaurants, and so on. Time on my own often entices me to succumb to my every whim and fancy on the culinary front. I already knew on Friday that I'd want this dish for lunch on the Sunday, one my mum used to make often when I was younger. It has four ingredients and is really quite delicious. It doesn't get much simpler.

Spinach, garlic and chorizo with bread

A perfect weekend lunch or very quick dinner.

Serves 2

Two small sausages of chorizo
4-8 cloves or garlic (I'm always heavy handed - choose to taste)
200g spinach
Quality bread

Toast your bread under the grill while you get on with the below.

Chop up your chorizo into small pieces and dry fry for a couple of minutes. Add a bit of olive oil and add the thinly sliced garlic - fry on a medium heat until the garlic is cooked but not browned.

Turn down the heat, add your spinach and toss until it's all wilted. Season with salt and pepper to taste.


You can replace the chorizo with spicy Italian sausage if you happen to have access to a good deli - that's what my mum makes it with and it's equally spectacular.

Spinach and garlic have always been the best of friends in my eyes. Add the smoky heat from the paprika laden chorizo and you're onto something really good. Pile up little mountains of the spinach goodness onto the bread and get your chops round it quick time.

Alfiyet olsun.

Saturday, 2 February 2013

Marmalade Cake

'Tis the season for Seville oranges, in case you didn't know. The observant among you may have noticed a new crate in the cirtrus arena of the fruit aisles displaying these lumpy and quite dull looking wonders. These aren't oranges you want to eat without cooking - they're not at all sweet, and are in fact quite bitter. While the season for them remains and we continue to find them in our greengrocers and supermarkets, kitchens across the land will have their weekends occupied with the making of that wondrous toast, panettone and brioche topping, my favourite of all the conserves - marmalade. That is what Seville oranges were bestowed upon this earth for.


In celebration of this annual event and to play my part, I wanted to make something involving some Seville orange marmalade without making it itself. Cakes and citrus have always been the best of friends, and so a marmalade cake it would have to be.

I've been lucky enough to visit Seville
- this is a photo I took of the world famous oranges

Marmalade Cake

A sticky orange cake not shy on the orange front. Marmalade, orange juice and zest in the sponge, topped with caramelised orange slices, and drizzled with a marmalade glaze. There's a few recipes out there but this one by Jamie Oliver fully embraces the orange in all its glory, and I like that.

Makes about 10 slices

200g butter softened, plus a large knob for greasing
4 tbsp demerara sugar
2 small oranges, thinly sliced
200g golden caster sugar 
6 heaped tbsp fine-cut Seville marmalade
4 large eggs, beaten
200g self-raising flour (or 200g plain flour with 2.5tsp baking powder)
50g ground almonds
Finely grated zest and juice of 2 oranges

Preheat the oven to 180C/gas 4. Grease the base and sides of a 23cm loose-bottomed cake tin. Sprinkle the base with the demerara sugar. Arrange the orange slices on the base of the tin in a slightly overlapping layer.


Cream the butter and caster sugar until pale and fluffy, then beat in 3 heaped tablespoons of marmalade, followed by the beaten eggs. Fold in the flour, ground almonds, a pinch of salt, and the orange zest and juice.


Carefully pour the cake batter into the tin. Place in the oven and bake for about 50 minutes, until golden and firm to touch.

Remove from the oven and allow to stand for a few minutes. Very carefully, while it’s still slightly warm, turn out the cake onto a serving plate.

Prick holes in the cake with a skewer. Make a glaze by warming the rest of the marmalade in a pan with a little water. Spoon this over the cake. Serve warm or at room temperature with yoghurt, cream or ice cream. Or my favourite, with a cup of tea.


Alfiyet olsun.

Friday, 1 February 2013

Cheesy Veg Bake

I've been a bit unlucky over the past two weeks on the health front - wiped out for a few days by flu, shortly followed by a couple of days of mild food poisoning. Hence the infrequent posts of late. I blame the oysters from Tuesday's meal for the latter. Delicious as they were, I suppose eating raw shellfish will always be a game of Russian roulette to an extent - an interesting article on the risks from the BBC here. Enough to put anyone off, but don't let it. My standpoint is they provide enough pleasure to outweigh the possible infrequent bout of sickness - an occasional unwanted by-product that just comes with the territory.


For the past two days I had consumed three Weetabix, some milk and a biscuit - cramps and a complete loss of appetite prevented me from eating much more. However, this evening and thankfully in time for the weekend, my hunger finally returned and after initially forcing myself to cook with no desire to eat, the smells from the kitchen soon got the juices flowing and in no time at all, I was back to my usual self - hungry.

I was down almost two days worth of calories and dousing some vegetables in a cheese sauce and baking until golden and bubbling was as good a way as any to redeem them. And was also excellent. A cheesy veg bake it would be.

Cheesy Vegetable Bake

1 x cauliflower head
1 x broccoli head
4 x small leeks
50g cheddar
50g parmesan

For the white sauce
45g butter
45g plain flour
600ml full fat milk
150g strong cheddar

Preheat your oven to 200C (fan).

Cut your broccoli and cauliflower into florets and thickly slice the leeks. Boil in water on a full roll for a few minutes until just nearing tender. Drain well.


In the meantime make your cheese sauce. If you haven't done so before, it is incredibly easy.

Melt the butter in a saucepan - when foaming and the flour and mix with a wooden spoon until you get a sort of paste.


With the heat still on medium, add a big splash of milk at a time, ensuring you thoroughly mix with the wooden spoon until the mixture is smooth again, before adding the next bit of milk. Keep doing this until all the milk has been used. You'll be left with a smooth white sauce. Season to taste.

Take the saucepan off the heat and add your grated cheese, stirring until it's all melted. You now have your cheese sauce.

Tip your drained vegetables into an oven proof dish. Pour over the cheese sauce. Grate the remaining cheeses and sprinkle on top. Bake in the oven until golden and bubbling.

Superb on it's own and just as good as a side to a piece of beef perhaps.

Enjoy with a touch of guilt.

Alfiyet olsun.

Wednesday, 23 January 2013

Fruit n' Veg Crisps

How often does a well meaning piece of fruit, offering the promise of good intentions on a Monday get left by the side of your computer at work, slowly degrading over the course of the week to a pathetic shadow of its former glory by Friday? This happens a lot for me.

I'm a grazer. I like to constantly pick at food and I have usually consumed at least one thing edible most hours of the working day. A whole piece of fruit doesn't really fit this criteria - I may just want a bite of apple for now. Its unspoken expectation for me to consume the whole thing in one go is not something I may necessarily want to commit to. And if I don't, it starts to turn the familiar brown as it reacts with the air. I'm not going to eat it after that. I could of course throw back to my childhood years and cut up a bunch of fruit into bite size pieces. And despite how old you are, this always seems to make it easier to eat - it's actually a good option.

I've discovered a different way to consume the fruit and veg I want to eat over the course of the day - turn them into crisps. Packets of vegetable crisps available in the shops are nothing new. But they are high in fat, more often than not fried in oil so not exactly the healthy option. It is in fact very possible and quite easy to replicate these crispy crunchy bite-sized pieces of goodness at home, and without the need for any oil.

These are an excellent alternative to taking whole pieces of fruit to work - I guarantee you'll actually eat these. They're also a great way to consume veg that you would usually not on a daily basis - like beetroot for example.

Fruit n' Veg Crisps

You want one piece of each type of fruit or veg for every day you are making these for. For example, if you're making these snacks for three days, take three apples and three beetroot. Get the biggest beetroot you can find as they'll provide bigger individual crisps. And they're all the ingredients you will need.

The other thing you will need and is well worth investing in is a V-slicer, something like this. They will slice your fruit and veg into uniform wafer thin slices in no time at all, quite difficult and time consuming to achieve without one. They have additional attachments which dice and also julienne your ingredients - great for making coleslaw or when julienne vegetables is required.


Preheat the oven to about 100C (fan).

Slice up your apples so they're wafer thin - skin and all. Slice right through the core, you can just remove any bits of pips or stalks after if they're present.


Peel your beetroot and then slice these the same way. Don't forget you'll get the colour everywhere, so do these last so as not to stain everything else.

Lay all the slices on oven dishes covered with foil - you can overlap them quite heavily as they will shrink considerably. The slices of around two apples will take up almost a whole tray, so really pack them in. You want to be able to fit at least three trays in your oven - I usually have two on shelves and one on the bottom of the oven.


Put the trays in, and give them a couple of hours. As the oven is so low, they're not really cooking but are in fact getting dehydrated. All you will need to do is check them every 20 minutes or so - when you open the oven door you'll be greeted with a face full of apple and beetroot steam, which is exactly what should happen.


When you do check them, shift them all around a bit so they don't stick to each other and the foil. You'll notice them shrinking, and then starting to go crispy. As the beetroot has less water content, they usually get done first. After 1.5-2hrs they will start to feel crispy - as they do remove them from the tray and transfer to an airtight container. The apples will be the last to crisp up.

If you're not sure if they're crispy yet, take the tray out of the oven - often a few seconds exposed to the cold air finishes off the crisping process.

This would work with any root veg and I plan to try them with sweet potato, parsnip, swede - but remember you want something that has a decent diameter or they'll shrivel to nothing. So carrots are also suitable but get huge ones, cut them in half and slice them lengthways rather than across their diameter, so you get a bigger surface area.

I suspect that the lower the water content, the more likely they could burn. So if you do try the above mentioned veg, toss your slices in a very small amount of oil to give them a light coating. You can also season with salt and pepper at this stage if you wish.

In terms of fruit, pears are also excellent alongside the apples.

Keep them all in the container and consume a handful everyday - you've retained all of the fibre and nutrients and just removed the water. The perfect grazing snack.

Alfiyet olsun.


Sunday, 20 January 2013

Moussaka

Shopping lists are a vital part of my supermarket visits - without them I would wonder aimlessly and take twice as long to pick out half as much. They focus your time and your budget on the things that you actually need, and will eat. This week I decided to take it a step further and as any well meaning lifestyle TV show will tell you to do, planned what we were going to eat for the whole week and bought the ingredients accordingly in a single trip - I believe this is known in the industry as the 'big Saturday (or Friday) shop'.


This was the first time we tried this, and it's excellent. It involves one of my virtues and one of my loves - planning and food respectively. It also means several things - firstly, you get to indulge in a bit of recipe ogling as you flick through books, magazines and the internet to work out what you'll be rustling up in the week, in turn resulting in you already looking forward to Thursday's dinner whilst it still in fact only being Saturday morning. Secondly, you use up everything you purchase as you've accounted for it all - if you hate waste like I do, this is only good news. Thirdly, you're not faced with both yourself and the parter returning home from work at the same time and declaring 'so what's for dinner?' whilst exchanging blank looks. Fourthly, the amount of both time and money you spend in the supermarket is greatly reduced - if you're following a list you tend to steer away from 'special offers' which more often than not translate to BOGOF's that you don't really want, resulting in the GOF part being thrown away because it's gone off before you managed to finish the BO part. And finally, you have a tasty well thought out dinner waiting for you at home. You just now need to decide who's cooking it.

Dinner for the weekend often involves red meat (we tend to steer away from it during the week) and it had been more than a comfortable amount of time since I had rustled this one up. Lamb mince, aubergines, yoghurt and feta - added to the list.

Moussaka

Makes about 6 portions

2 onions, finely chopped

6 large garlic cloves, grated
500g lamb mince
1 tbsp tomato purée
½ tsp ground cinnamon
400g can chopped tomatoes
600g (about 2 medium) aubergines 
150ml Greek yogurt
1 egg, beaten
25g freshly grated Parmesan
50g feta
Dried oregano
Dried mint
Olive oil

Heat the oil in a large frying pan over a medium heat. Add the onion and garlic and cook, stirring until soft. Increase the heat, add the minced lamb and cook 5 minutes or so until browned. Drain off the fat in a sieve, then return the meat to the pan.

Add the purée and cinnamon and cook whilst stirring for 1 minute. Add the tomatoes, then half-fill the can with water and pour into the pan. Add a decent shaking of oregano, season, and bring to the boil. Reduce the heat and simmer, stirring occasionally for around 20 minutes.


Meanwhile, preheat the grill to medium-high. Cut each aubergine diagonally into 5mm-thick slices. Brush with oil, put half on a baking sheet and grill for a few minutes until golden on each side. Do the same with the remainder.


Preheat the oven to 200°C (fan). For the topping, mix the yoghurt, egg, dried mint and the cheeses. Season with pepper.

Spread half the lamb mixture in a deep oven proof dish. Overlap with half the aubergine and the rest of the lamb. Top with rest of the aubergine and spoon over the yoghurt mixture. Bake for 35 minutes or until golden and bubbling. Eat piping hot - bloody lovely.


Alfiyet olsun.

Saturday, 19 January 2013

Brioche


Is there anyone on the planet that doesn't like brioche? The answer to that is of course, no. And if you haven't had the opportunity to try it yet, I suggest you get acquainted with immediate effect and some urgency - a second longer without its existence in your life is a second too long. I suspect there are only a few things that encapsulate the very essence of pleasure more than eating freshly baked brioche still warm from the oven with a slathering of really good jam. Which is what I just did, and it was excellent. So excellent, that this blog post has bumped to the top of the queue of my mini back-log and Heston's Dinner is just going to have to wait. This bread laughs in the face of his Michelin star.

For those who may not be familiar with this bread, it is classically French and slightly sweet. The dough is enriched with eggs and a whole packet of butter. Well, it is French. The best way to eat this is warm with some excellent conserve and a coffee for a weekend breakfast or brunch - oh sod it, make it both.

Brioche

Makes 1 large loaf

This dough should be made the night before and left in the fridge to firm before shaping and proving - excellent if you want to get ahead. This recipe is from Paul Hollywood's How to Bake.

500g strong white bread flour, plus extra for dusting
7g salt
50g caster sugar
10g instant yeast
140ml warm full-fat milk
5 medium eggs
250g unsalted softened butter, plus extra for greasing.

Tip This recipe does really require a mixer due to the eggs and butter that are used - the dough becomes very wet and sticky. However, you could always do it by hand - it will just take quite a bit longer. The technique by hand will be very similar to that used in my panettone post - always good to try out if you haven't before for your hands to get familiar with heavily enriched doughs. However, if you do have a mixer, then this recipe is incredibly simple.


Tip I suggest purchasing some really good quality butter for this. It makes up a large proportion of the end result and will heavily influence the taste of your bread. Seeing as it's a French recipe, I've stuck with the French butter President.

Tip The dried active yeast I use is Allisons and comes in a sealable pot so it's easy to measure out the amount you need, unlike the individual sachets you can get which are usually 7g each.

Put the flour into the bowl of your mixer fitted with a dough hook. Add the salt and sugar to one side of the bowl and the yeast to the other.


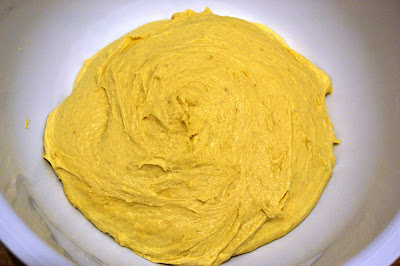
And the milk and eggs (the eggs should be at room temperature) and mix on a slow speed for 2 minutes, then on a medium speed for another 8 minutes until you have a soft, glossy, elastic dough. Add the softened butter a bit at a time and continue to mix for a further 5 minutes, scraping down the bowl periodically to ensure all of the butter is thoroughly incorporated. The dough will be very soft.

Tip the dough into a plastic bowl, cover and chill overnight or for at least 7 hours until it is firmed up and you are able to shape it.


After it has had its time in the fridge, grease a 25cm round deep cake tin. Tip the dough onto a lightly floured surface and fold it on itself a couple of times to knock out the air. Divide it into 9 equal pieces and shape each piece into a smooth ball. You can do this by placing it into a cage formed by your hand against the table and moving your hand around in a circular motion, rotating the ball rapidly. Put eight of the balls around the edge of the tin and one in the centre. Don't worry if they're not yet snug - they will be when they rise.

Cover with clingfilm and leave to prove for around 2 hours in a warm place until the dough has doubled in size - I always do mine in a very low oven, barely switched on.

dough before proving
dough after proving

Heat the oven to 190C and when the brioche has proved, bake for 20-30 minutes or until a skewer inserted into the centre comes out clean. Bear in mind the sugar and butter in the dough will make it take on colour before it is actually fully baked. Remove the brioche from the tin and cool on a wire rack. Tear off a portion whilst still warm and board the pleasure train.


Alfiyet olsun.
print button